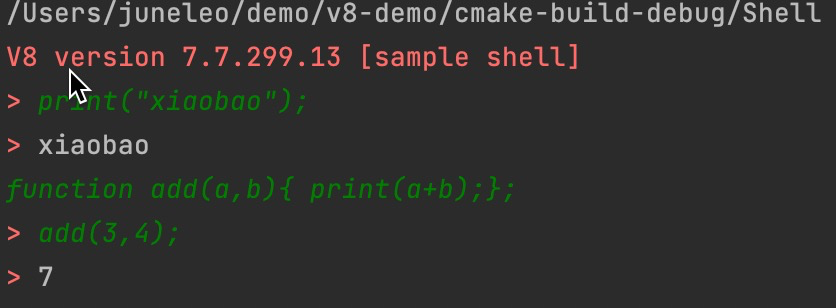
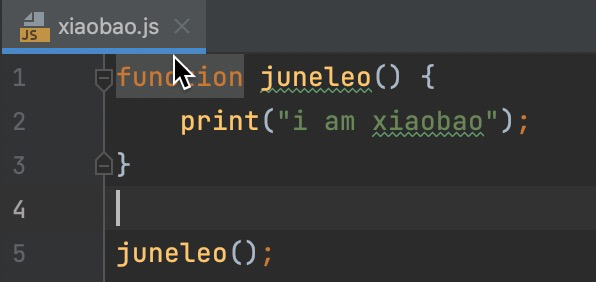
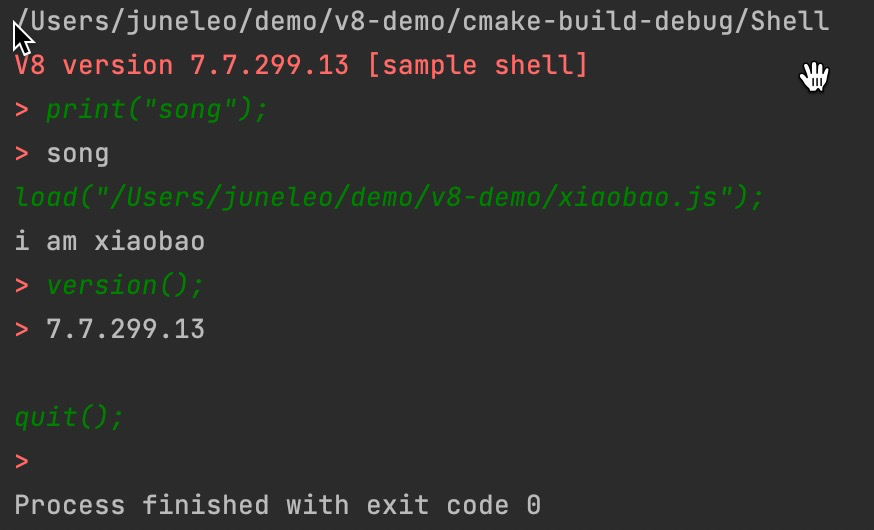
0%

C++中嵌入V8引擎

学习本文的收益:

1.掌握如何使用V8引擎

2.对于小程序V8 Worker的理解更深刻

3.了解JsApi的注入和调用原理

模仿my.call (jsapi)

环境

1.xcode

2.git

3.depot_tools

  • 下载
    1
    git clone https://chromium.googlesource.com/chromium/tools/depot_tools.git
  • 添加到PATH
    1
    export PATH=/path/to/depot_tools:$PATH

编译

1.fetch

使用depot_tools提供的fetch,本地会生成.gclient,有点类似repo,mkit工具

1
2
3
mkdir ~/v8
cd ~/v8
fetch v8

fetch v8 会自动触发gclient sync,如果我们要切换分支,我们应该终止gclient sync,然后切换分支,最后手动gclient sync

.gclient文件,如果是fetch [android | ios] 这里将会有一些差异

1
2
3
4
5
6
7
8
9
solutions = [
{
"name": "v8",
"url": "https://chromium.googlesource.com/v8/v8.git",
"deps_file": "DEPS",
"managed": False,
"custom_deps": {},
},
]

.gclient_entries文件 ,多个git仓库本地映射

1
2
3
4
5
6
7
8
9
10
11
12
13
14
15
16
17
18
19
20
21
22
23
24
25
26
27
28
29
30
entries = {
'v8': 'https://chromium.googlesource.com/v8/v8.git',
'v8/base/trace_event/common': 'https://chromium.googlesource.com/chromium/src/base/trace_event/common.git@cfe8887fa6ac3170e23a68949930e28d4705a16f',
'v8/build': 'https://chromium.googlesource.com/chromium/src/build.git@1e5d7d692f816af8136c738b79fe9e8dde8057f6',
'v8/buildtools': 'https://chromium.googlesource.com/chromium/src/buildtools.git@67b293ca1316d06f7f00160ce35c92b8849a9dc9',
'v8/buildtools/clang_format/script': 'https://chromium.googlesource.com/chromium/llvm-project/cfe/tools/clang-format.git@96636aa0e9f047f17447f2d45a094d0b59ed7917',
'v8/buildtools/mac:gn/gn/mac-amd64': 'https://chrome-infra-packages.appspot.com/gn/gn/mac-amd64@git_revision:972ed755f8e6d31cae9ba15fcd08136ae1a7886f',
'v8/buildtools/third_party/libc++/trunk': 'https://chromium.googlesource.com/chromium/llvm-project/libcxx.git@5938e0582bac570a41edb3d6a2217c299adc1bc6',
'v8/buildtools/third_party/libc++abi/trunk': 'https://chromium.googlesource.com/chromium/llvm-project/libcxxabi.git@0d529660e32d77d9111912d73f2c74fc5fa2a858',
'v8/buildtools/third_party/libunwind/trunk': 'https://chromium.googlesource.com/external/llvm.org/libunwind.git@69d9b84cca8354117b9fe9705a4430d789ee599b',
'v8/test/benchmarks/data': 'https://chromium.googlesource.com/v8/deps/third_party/benchmarks.git@05d7188267b4560491ff9155c5ee13e207ecd65f',
'v8/test/mozilla/data': 'https://chromium.googlesource.com/v8/deps/third_party/mozilla-tests.git@f6c578a10ea707b1a8ab0b88943fe5115ce2b9be',
'v8/test/test262/data': 'https://chromium.googlesource.com/external/github.com/tc39/test262.git@26a2268436f28f64c4539d9aab9ebd0f0b7c99c5',
'v8/test/test262/harness': 'https://chromium.googlesource.com/external/github.com/test262-utils/test262-harness-py.git@4555345a943d0c99a9461182705543fb171dda4b',
'v8/test/wasm-js/data': 'https://chromium.googlesource.com/external/github.com/WebAssembly/spec.git@1a411f713d9850ce7da24719aba5bb80c535f562',
'v8/third_party/depot_tools': 'https://chromium.googlesource.com/chromium/tools/depot_tools.git@ee7b9dda90e409fb92031d511151debe5db7db9f',
'v8/third_party/googletest/src': 'https://chromium.googlesource.com/external/github.com/google/googletest.git@6077f444da944d96d311d358d761164261f1cdd0',
'v8/third_party/icu': 'https://chromium.googlesource.com/chromium/deps/icu.git@fd97d4326fac6da84452b2d5fe75ff0949368dab',
'v8/third_party/instrumented_libraries': 'https://chromium.googlesource.com/chromium/src/third_party/instrumented_libraries.git@b1c3ca20848c117eb935b02c25d441f03e6fbc5e',
'v8/third_party/jinja2': 'https://chromium.googlesource.com/chromium/src/third_party/jinja2.git@b41863e42637544c2941b574c7877d3e1f663e25',
'v8/third_party/markupsafe': 'https://chromium.googlesource.com/chromium/src/third_party/markupsafe.git@8f45f5cfa0009d2a70589bcda0349b8cb2b72783',
'v8/third_party/perfetto': 'https://android.googlesource.com/platform/external/perfetto.git@0e8281399fd854de13461f2c1c9f2fb0b8e9c3ae',
'v8/third_party/protobuf': 'https://chromium.googlesource.com/external/github.com/google/protobuf@b68a347f56137b4b1a746e8c7438495a6ac1bd91',
'v8/tools/clang': 'https://chromium.googlesource.com/chromium/src/tools/clang.git@f485a21a9cb05494161d97d545c3b29447610ffb',
'v8/tools/clang/dsymutil:chromium/llvm-build-tools/dsymutil': 'https://chrome-infra-packages.appspot.com/chromium/llvm-build-tools/dsymutil@OWlhXkmj18li3yhJk59Kmjbc5KdgLh56TwCd1qBdzlIC',
'v8/tools/luci-go:infra/tools/luci/isolate/${platform}': 'https://chrome-infra-packages.appspot.com/infra/tools/luci/isolate/${platform}@git_revision:7d11fd9e66407c49cb6c8546a2ae45ea993a240c',
'v8/tools/luci-go:infra/tools/luci/isolated/${platform}': 'https://chrome-infra-packages.appspot.com/infra/tools/luci/isolated/${platform}@git_revision:7d11fd9e66407c49cb6c8546a2ae45ea993a240c',
'v8/tools/luci-go:infra/tools/luci/swarming/${platform}': 'https://chrome-infra-packages.appspot.com/infra/tools/luci/swarming/${platform}@git_revision:7d11fd9e66407c49cb6c8546a2ae45ea993a240c',
'v8/tools/swarming_client': 'https://chromium.googlesource.com/infra/luci/client-py.git@96f125709acfd0b48fc1e5dae7d6ea42291726ac',
}

2.下载

1
gclient sync

3.编译

  • 3.1 使用gm构建编译 (简单)

    1
    tools/dev/gm.py x64.release    //如果编辑后要立即运行测试使用 x64.release.check
  • 3.2 使用 gn 手动编译

    1
    2
    3
    gn gen out.gn/x64.release

    ninja -C out.gn/x64.release
  • 3.3使用v8gen 手动编译

    1
    2
    3
    4
    5
    tools/dev/v8gen.py x64.release

    ninja -C out.gn/x64.release

    ninja -C out/x64.release d8 //构建特定目标

编译嵌入c++的v8

完整流程

1
2
3
4
5
6
7
8
9
10
11
12
13
14
15
16
17
18
19
20
21
22
23
#下载

mkdir ~/v8

cd ~/v8

fetch v8 //这里我们终止 ctrl + c

cd v8

git checkout refs/tags/7.1.11 -b sample -t

cd ..

gclient sync

#编译

cd v8

tools/dev/v8gen x64.release.sample

ninja -C out.gn/x64.release.sample v8_monolith

这里我们选择了第三种编译方式v8gen,但是略有不同的是我们直接将所有的动态库连接起来,直接生成了v8_monolith.a

接下来我们可以进行简单的测试,使用官方提供的方式

1
2
3
g++ -I. -Iinclude samples/hello-world.cc -o hello_world -lv8_monolith -Lout.gn/x64.release.sample/obj/ -pthread -std=c++14 -DV8_COMPRESS_POINTERS

./hello_world

hello_world.cpp

1
2
3
4
5
6
7
8
9
10
11
12
13
14
15
16
17
18
19
20
21
22
23
24
25
26
27
28
29
30
31
32
33
34
35
36
37
38
39
40
41
42
43
44
45
46
#include <stdio.h>
#include <stdlib.h>
#include <string.h>
#include "include/libplatform/libplatform.h"
#include "include/v8.h"

int main(int argc, char* argv[]) {
// 初始化v8
v8::V8::InitializeICUDefaultLocation(argv[0]);
v8::V8::InitializeExternalStartupData(argv[0]);
std::unique_ptr<v8::Platform> platform = v8::platform::NewDefaultPlatform();
v8::V8::InitializePlatform(platform.get());
v8::V8::Initialize();
// 创建一个isolate
v8::Isolate::CreateParams create_params;
create_params.array_buffer_allocator = v8::ArrayBuffer::Allocator::NewDefaultAllocator();
v8::Isolate* isolate = v8::Isolate::New(create_params);
//构建好isolate开始编程
{
v8::Isolate::Scope isolate_scope(isolate);
// 构建一个handle_scope管理即将分配的各种变量
v8::HandleScope handle_scope(isolate);
// 构建一个上下文context
v8::Local<v8::Context> context = v8::Context::New(isolate);
{
// 将context放进scope中v8会进行管理
v8::Context::Scope context_scope(context);
// 构建一段string类型的handle,这一段内容就是javascript了
v8::Local<v8::String> source = v8::String::NewFromUtf8(isolate, "'Hello' + ', World!'", v8::NewStringType::kNormal).ToLocalChecked();
// 编译代码
v8::Local<v8::Script> script = v8::Script::Compile(context, source).ToLocalChecked();
// 跑代码
v8::Local<v8::Value> result = script->Run(context).ToLocalChecked();
//转换成utf8的变量
v8::String::Utf8Value utf8(isolate, result);
//c语言经典打印函数
printf("%s\n", *utf8);
}
}
// 关闭v8并且清理内存
isolate->Dispose();
v8::V8::Dispose();
v8::V8::ShutdownPlatform();
delete create_params.array_buffer_allocator;
return 0;
}

v8引擎使用

  • 初始化V8
  • 创建一个新的隔离区(isolate),并将这个隔离区置为当前使用
  • 创建一个栈分配的句柄范围 (handle_scope)
  • 创建一个上下文 (Context)
  • 进入上下文编译和运行脚本 (Compile 和 Run)
  • 销毁isolate以及使用过的buffer,并关掉进程 (Dispose)

嵌入C++

1.使用CLion新建一个C++项目,构建工具选择cmake

2.复制v8/sample目录资源到C++项目

3.CMakeLists.txt

1
2
3
4
5
6
7
8
9
10
11
12
13
14
15
16
17
18
cmake_minimum_required(VERSION 3.2)
project(v8-demo)

include_directories(/Users/juneleo/v8/v8/include)
include_directories(/Users/juneleo/v8/v8)

link_directories(
/Users/juneleo/v8/v8/out.gn/x64.release.sample/obj
)
link_libraries(
v8_monolith
)

set(CMAKE_CXX_FLAGS "${CMAKE_CXX_FLAGS} -std=c++0x -pthread")

add_executable(HelloWorld ./helloworld.cc)
add_executable(Process ./process.cc)
add_executable(Shell ./shell.cc)

4.运行

4.1 运行HelloWorld

4.2 运行Shell

4.3 通过查看shell.cc,支持传入js文件

4.4 ObjectTemplate

1
2
3
4
5
6
7
8
9
10
11
12
13
14
15
16
17
18
19
20
21
22
23
24
25
26
27
28
v8::Local<v8::Context> CreateShellContext(v8::Isolate* isolate) {
// Create a template for the global object.
v8::Local<v8::ObjectTemplate> global = v8::ObjectTemplate::New(isolate);
// Bind the global 'print' function to the C++ Print callback.
global->Set(
v8::String::NewFromUtf8(isolate, "print", v8::NewStringType::kNormal)
.ToLocalChecked(),
v8::FunctionTemplate::New(isolate, Print));
// Bind the global 'read' function to the C++ Read callback.
global->Set(v8::String::NewFromUtf8(
isolate, "read", v8::NewStringType::kNormal).ToLocalChecked(),
v8::FunctionTemplate::New(isolate, Read));
// Bind the global 'load' function to the C++ Load callback.
global->Set(v8::String::NewFromUtf8(
isolate, "load", v8::NewStringType::kNormal).ToLocalChecked(),
v8::FunctionTemplate::New(isolate, Load));
// Bind the 'quit' function
global->Set(v8::String::NewFromUtf8(
isolate, "quit", v8::NewStringType::kNormal).ToLocalChecked(),
v8::FunctionTemplate::New(isolate, Quit));
// Bind the 'version' function
global->Set(
v8::String::NewFromUtf8(isolate, "version", v8::NewStringType::kNormal)
.ToLocalChecked(),
v8::FunctionTemplate::New(isolate, Version));

return v8::Context::New(isolate, NULL, global);
}

运行

4.5 模仿小程序my.call

1
2
3
4
5
6
7
8
9
10
11
12
13
14
15
16
17
18
19
20
21
22
23
v8::Local<v8::Context> CreateShellContext(v8::Isolate* isolate) {
// Create a template for the global object.
v8::Local<v8::ObjectTemplate> global = v8::ObjectTemplate::New(isolate);
...
//构建全局my 对象模版
v8::Local<v8::ObjectTemplate> my = v8::ObjectTemplate::New(isolate);
//设置call 方法模版
my ->Set(
v8::String::NewFromUtf8(isolate, "call", v8::NewStringType::kNormal).ToLocalChecked(),
v8::FunctionTemplate::New(isolate, Call));

global -> Set(
v8::String::NewFromUtf8(isolate, "my", v8::NewStringType::kNormal).ToLocalChecked(),
my
);

return v8::Context::New(isolate, NULL, global);
}

// 模仿 call 方法
void Call(const v8::FunctionCallbackInfo<v8::Value>& args) {
printf("调用了my.call");
}

运行 my.call 函数

通过对象模版和方法模版,我们可以联想到小程序中的my.xxxx,这些jsapi可能都是通过方法模版进行注入的,java层/object-c层,通过调用c层对应的方法进行注入,这些注入的方法将被js所调用。

参考